Tuesday, September 30, 2008

Technique Tuesday - Chalkin' it up!

For today's Technique Tuesday I will be going over the Chalkboard technique. It's a simple technique and not very time consuming.
To start you are going to need your chalks, q-tip, stamp image, cardstock and your white craft pad. The image turns out better when you use a dark cardstock color.

Stamp out your image onto the cardstock where you want your image. In this case I wanted several images to run along the bottom of my card.


Using your q-tip add color to the image based on your color design.


I wanted several colors on my images so I added an additional color after applying the first. Once you have your image(s) colored to your specifications you are all set.

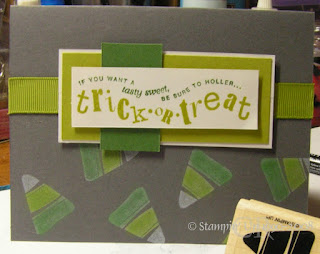
Here is my finished card. I wanted to make a Halloween card and I love candy corn corn, so I thought this would be cute. It came out close to what I had in mind. I know candy corn isn't traditionally in green colors but there are so many new flavors of candy corn now so it very well could be. I almost made it in red tones since I just picked up a package of red candy corn, caramel apple flavored and they are good too! BUT since I had green scrap on my desk that was the color I went with.

Hope you found the tutorial useful! Leave me a comment if there is a technique you would like to learn.

Recipe: Stamp Set - Tasty Sweet; Cardstock - Basic Gray, Garden Green, Kiwi Kiss, Whisper White; Ink - Craft White; Accessories - Garden Green Marker, Old Olive Marker,Old Olive Grosgrain Ribbon 5/8", Dimensionals, Chalk

Monday, September 29, 2008

Halloween Scrappin'

This was the other project we made the other day. Everyone came up with a different scrapbook page and if I thought of it I would have taken pictures of the other ones to share. I started off making a whole different page but changed my mind half way through. I like how this came out but I think it's still missing something (besides the pictures). I am sure I'll figure it out once I do add in the pics. After playing with this set I just might have to buy it and the wheel too. It sure was fun to get together!

Saturday, September 27, 2008

Drinking Spirals

I got together with some friends and fellow demos last Monday and we decided to make a few projects just for fun. One of the projects we made were these cute little spiral cards that we learned about at convention. I designed the front of the card, we wanted it to be nice and bright!! My original template I did in Tangerine Tango but I think the Pumpkin Pie worked just as well. They are pretty easy to make as long as the image you use on the inside is easy to cut. It took us a while to cut out 10 of the glasses. When I do a demonstration of these I will be definitely be doing something with the punches or with the big shot. It'll go much faster that way.
Pretty cute huh!?

I did the drawing for my card candy this morning, I got home late last night and was so tired I completely forgot about it. The winner is ....... Traci G. So if you will email me with your address I'll get it mailed out to you! Happy Stamping!

Friday, September 26, 2008

Bottle It Up

I made these cute little bottles for a swap I was in a few months back. It's made from the small Sam's water bottles. Just the perfect size for adding candy into. they would also be neat for baby shower favor.

Recipe: Stamp Set - By One's & By Two's; Ink - Barely Banana, Going Gray; Accessories - Barely Banana Marker, Sage Shadow Marker, Basic Gray Taffeta Ribbon, Crystal Effects

Wednesday, September 24, 2008

Random card

Wow it's been a long week and we are only half way through. I haven't had time to work on anything recent that I can share yet so I thought I would share this card I made a few months ago. Purple is my favorite color so I made this card using shades of purple. I tried turning the edges of the ribbon purple by running my marker along the sides and it looks okay just not too sure about the technique. I'll add the recipe later in the week. Hope you like it!

Tuesday, September 23, 2008

Technique Tuesday - Big Shot

My little one has been fascinated with my big shot. he thinks it is super cool to use it, mostly because I actually let him use it without hovering over him when he does. This machine is so easy to use and pretty much fool proof unless you are using a brass template .
My little one did help with this tutorial. To make your sandwich when using a original die start with one cutting plate, your die foam side up, cardstock, and clear cutting plate.


Turn handle so that your "sandwich" rolls through the Big Shot.


That sounds a bit funny ... good thing it's not a real sandwich. Anyways ...


Once you have it cut out attach it to your card. Happy Stamping!

Sunday, September 21, 2008

Thinking of You

I made this card from some scraps I had. I needed to make a few Birthday type cards quickly so I pulled out my scraps and found I had already stamp a bunch of Thinking of You sentiments on these white rectangles. Plus I had plenty of the Green Galore scraps so I added it to Tangerine Tango and add the flowery stamp from Friendship Blooms.

Recipe: Stamp Set - Friendship Blooms; Ink - Tangerine Tango, Green Galore; Cardstock - Tangerine Tango, Green Galore, Whisper White; Accessories - Green Galore Grosgrain Ribbon, Dimensionals, Mini Brads (not SU).

Saturday, September 20, 2008

The last ...

card I made using the Just Jawing set for now. This one is also has a rock star kind of feel to it just a bit more mellow. The blues definitely soften it up a bit BUT you could still use it as a masculine card. I made this card for a new catalog swap I was in and the quality of the swap was high caliber, if you like I can share them with you.

The gray piece is done using the big shot die Top Note. This die is soo awesome it can be used in many different ways and really adds a nice look. My son is completely fascinated with using my big shot and likes to use it. I think he was surprised I let him use it all by himself as most of my "tools" are of limits unless I am right next to him. He is actually pretty good about using my stuff properly especially for an 8 year old. Hope you like it!!
Recipe: Stamp Set - Just Jawing; Cardstock - Baja Breeze, Going Gray, Whisper White; Ink - Versamark, Baja Breeze; Accessories - Black Embossing Powder, Black Brads, Black Grosgrain Ribbon, Dimensionals

Wow! After just starting this blogger thing I have over 1000 hits to my site. I know that's the whole intent of having a blog, I just thought with all the other blogs would mine even get noticed. So I decided to do a little blog candy. Now the candy is some things I've had in my prize box, oldies but still goodies. Burst into Bloom stamp set (new, I did mount it) and a sampler pack of Tudor DSP with some buttons. If you want to be in on the card candy just leave me a comment and I will pick a winner on Friday the 26Th. The more comments you make the better your chances :) Happy Stamping!!

Friday, September 19, 2008

Another Just Jawing and a new special

I must have used Just Jawing set for a bunch of my Halloween swaps I did. To me it's just to cute!! So this one I did as a rock star version!! I dirtied up the skull a bit to give it a bit more dimension. Recipe: Stamp Set - Just Jawing; Ink - Versamark, Sahara Sand, Tangerine Tango; Cardstock - Tangerine Tango, Basic Black, Whisper White; Accessories - Black Embossing Powder, Black Brads, Dimensionals.

Stampin' Up! is offering a new Decor Elements design just for Halloween!! It's of this great Spooky Spider and it comes in 3 different sizes. This was a project they showed during convention and I thought it was just fabulous. I will be making one of these myself just as soon as I have some time!! The flyer and info is located on the right hand side of my blog. These great jars can be bought at WalMart for pretty cheap.
Lastly here is a little 3x3 I made using the Scary Skulls wheel. This is like my second time making a 3x3 and I'm sure they will get better the space just seems so small.

Recipe: Cardstock - Real Red, Basic Black, Going Gray; Ink - Real Red; Accessories - Circle Punch, Distresser, Black Brads

Thursday, September 18, 2008

A week of Just Jawing

Since I have a small fascination with the Just Jawing set I thought I would share with you the cards I have made so far using this set. I find that this set is much more versitle than most people think. With this card I decided to go girlie and use the cherry stamp as the background. I made this card for a halloween swap I am in but it could be used for all occasions.

Recipe: Stamp Set - Just Jawing; Cardstock - Riding Hood Red, Basic Black; Ink - Riding Hood Red, versamark; Accessories - Black and White Embossing powder, Black Grosgrain Ribbon, Micro Beads, Crystal Effets and Dimensionals.

Tuesday, September 16, 2008

My Favorite Stamp Set

I know I have said this several times but this one IS my favorite stamp set at least for this month.This set one the first one I just HAD to have out of the new catty!! It's mainly themed for girls but I had made several cards going with a more manly design. Here's one of them:
So what do you think? I like how the brown and blue go together so well.This week I will be showing several different cards with this set.

Recipe: Stamp Set - Just Jawing; Cardstock - Baja Breeze, Chocolate Chip; Ink - Chocolate Chip; Acessories - Crimper, Chocolate Chip ribbon, Circle Punch.

Well I installed new browser firefox thanks to a suggestion from the wonderful Belindaking from SCS. This browser is the best!! So in the next week or so I can actually update my demonstrator website, I didn't even know there was so much difference in browsers and boy I have to tell you I have been out BUT not anymore!!

Monday, September 15, 2008

My Business Website

Checkout my StampinUp! Business Website ... ok it's pretty much just the SU! template. As soon as I can figure out why my computer doesn't like the SU! encoding I won't be able to update anything but the first page and calendars. So sorry if everything is so basic and not personalized. I did the Business website because SU! if now offering online ordering!! Woohoo!! So if have an urge in the middle of the night to go shopping for supplies or new stamp sets you actually can. I'll will post more info soon...

Saturday, September 13, 2008

Not too sure..

if I like this card. I signed up for a Manly card swap and this is one of the cards I did. I do actually like it, it just seems that there is something missing. For the life of me I can't figure out what to add, maybe it's just that I've been doing some frilly stuff so it seems to be less wow. I mean how many men like glitter on their cards? What do you think?

I also decided to go back to my old blog header. I'm gonna stay with this one until I make something I like better.

Recipe: Stamp Set - Just Football; Cardstock - Brilliant Blue, Chocolate Chip, Sahara Sand; Ink - Basic Brown; Accessories - Twill Ribbon, Dimensionals, Crimper

Friday, September 12, 2008

Decorative Planner

I was slightly bummed that this year Su! didn't do the wrapping paper again but since I horded several rolls of it last year I felt safe in making this little project. I took the standard planning calendars and covered it up. It is a simple project and takes very little time to get done. Simple and quick is what I am all about!! I think it came out real cute and those of you who received it as a gift I hope it was handy!!

Wednesday, September 10, 2008

My Own Bouquet


The flowers my husband gave me are very pretty but I wanted to show you a set I made myself. I've done these flower bouquets in several versions unfortunately I couldn't find the other pictures. Since I made them as gifts I can't go back and take the pictures. Hmmm maybe they will snap one for me? Anyways I've done these in bold brights and a mini version using a water can. They are simple to make and make A PERFECT LITTLE GIFT!!

Tuesday, September 9, 2008

Technique Tuesday - What Not to do


I've been getting questions regarding the Big Shot and about it's compatibility with the cuttlebug embossing folder. Since I own only one cuttlebug embossing folder I figured I would use it and try it out. I used one cutting plate, the pre made sandwich and a cardboard slip as my sandwich and I do have to say it works superbly with the folder. Look how nice the impression was. (sorry about the blurry pic) So for those of you who were wondering yes it does work!


So I thought I would try it on the brass stencils and see how the embossing worked. For my sandwich I used the same as above but added foam underneath the cardstock. It also made a nice clear impression BUT make sure you put the cutting plate on top or you get this......


not so good for your brass template if you don't. My Big Shot tried to suck up the tmplate and I just about had a coronary. Thanks goodness I was able to fix by running it back through with it upside down and now it's perfectly flat again.


Today is my wedding Anniversary. We've been married for 4 years now, been together for 14. My husband is very supportive of my addiction. He actually encourages me to buy stamps. But anyways he came home today with this. Aren't they beautiful!!


Later tonight we are going out to dinner. I think he's pretty wonderful!!

Sunday, September 7, 2008

All Smiles

Here is another card card using my favorite of all times stamp set. If I recall correctly this was the first stamp set I bought because I wasn't going to buy anything except the rollers to make my own background paper but this was the ONE set I had to have. It all went down hill from there.

I wanted to make a card that was nice and cheery. After much finagling I created this card and was surprised in how nice it came out. Hope you like it too!!

Recipe: Stamp Set - Smile; Cardstock - Cameo Coral, Gable Green, Whisper White; Ink - Cameo Coral, Gable Green; Accessories - Gable Green Grosgrain Ribbon, White Grosgrain Ribbon, Dimensionals

Saturday, September 6, 2008

Altering intentions

I rarely ever do a card challenge mostly cuz I'm lazy because I rarely have time BUT there was one posted a while back ago about using a stamp different that it's original intent AND I actually had an idea. Embrace life is my favorite stamp set, I know I've said that before but really all my sets are my favorite, so I decided to use the flower from it and make a butterfly. I think it came out perfectly which is amazing in itself because my ideas don't translate as well when I actually do it.

Recipe: Stamp Set: Embrace Life Cardstock: Certainly Celery, Barely Banana, and Naturals White Ink: Certainly Celery Accessories: White Gel Pen, Blender Pens, Barely Banana Marker, Silver Cord, Dimensionals, and Beads.
Related Posts with Thumbnails