Tuesday, August 31, 2010

Technique Tuesday - Tag Holder

Welcome back to another Technique Tuesday!! As promised I am sharing how to make the tag holder. I promise it's super simple and easy to make!!

Start with one full sheet of 8 1/2 x 11 cardstock. Start by creating a score 3 inches on both sides of the cardstock; this will be done along shorter ends. Then score along the longer side at 2 inches and again at 5 1/2 inches. Then trim off at 7 3/4 inches.


After you have created you score lines cut off the four corners. At this point I would decorate the outside and inside which I did by using one of our jumbo wheels.


You will need to create additional score lines at in order to create some depth to the pocket. I created an additional score 1/8 of an inch from the original lines on all four sides. Use some dimensionals or some foam tape to tape down one flap along the sides only. I used the bottom flap that measures 1 7/8 inches.


In this picture you can see the flap taped down. The two side flaps will fold in and the top flap will fold down. That's all you need to do to create the base of the tag holder the following steps are just additional information on how I decorated mine.


Then decorate as you would like. I did a lot of sponging along all the edges.


I tied the ribbon around just the top flap.


If you look you can also see that I used the old slit punch; that is what I used in order to keep the flap down. I cut a small slit along the back of the chocolate chip piece that you could slide the flap into. You could always use Velcro; which is what I was going to do but couldn't find where I hid it in my craft room. The chocolate chip piece is scored 1/4 inch from the bottom folded in and I just taped down that single flap so I could fold over that piece on top of the top flap.


If you have any questions I did not cover just let me know! As always if you use the tutorial please come back an leave a comment with a link to your post so I can see the wonderful projects you create!! Happy Stamping!!

Friday, August 27, 2010

Stampin' Addicts Holiday Mini Blog Hop - Tags til Christmas

Welcome to Stampin' Addicts Holiday Mini Blog Hop!! When I got the new mini I just knew I had to everything in it and if you didn't already you will by the time this hop is over!! In this hop we are featuring 22 items from the Holiday Mini as well as many of the accessories! So come join the fun!!

If you are following this hop in order then you have just come from Adriana's Escape 2 Stamp where she shared projects using the Vintage Frames Decor Stencils. How fun were those?? If you are continuing to follow the hop in order I will provide the next link at the bottom of the post or you can check in on our chat thread over at Stampin' Addicts!

On my blog I am featuring the stamp set Tags til Christmas!! This was one of those sets I just had to have and if you are like me I love to wrap packages all pretty for Christmas. This set is a great way to add something extra special to those packages with a handmade tag! So for my first project I made this super cute kid's shaker tag!!

Stinkin' cute huh!?! What kid wouldn't love this on their package AND to keep it well after their present has been opened. On this project I used the Treat Cups and Silver Glass Glitter as well as the Jolly Jingles jumbo wheel all from the Holiday Mini. I used the new Dotted Scallop Ribbon Border Punch and Rhinestones from the big catty.

Even though this set was created for the use of making tags you can also you it to make cards.

I had so much fun making this card ... it took me a bit to get all the elements just right but love how it came out!!I used the ornament stamp and punched out several using the matching punch from the big catty. I also used the Jolly Jingles wheel in this project as well on the background Certainly Celery cardstock piece. To add a bit more texture I also used a button from the Candy Cane designer buttons also found in the Mini. I needed a bit more white around the button and since I didn't have any buttons in that color I made my own with a piece of white cardstock; it worked perfectly! Now you are probably wondering how I made the lace around the ornament. It's actually pretty simple I just punched a long piece of cardstock out with the Dotted Scallop Ribbon Border punch from the big catty. I folded peaks and valleys all round each of the indents. Pretty neat. Love the extra texture it gave!

Now this last project was the first one I made for the hop and my absolute favorite project!!


It's a tag holder ... perfect to give to others to use on their gift packaging needs!! I love the vintage and elegant design of this project. Here is what it looks like all opened up.


So what do you think?? Would you like to learn how to make it? On my next Technique Tuesday I will show you the four simple steps in creating the holder. If you want a reminder when I post the tutorial you can sign up for email notification or become a follower which can both be located on my right side bar. The additional items I used in creating this project was the Jolly Jingles wheel, Decorative Label jumbo punch, and Cherry Cobbler seam binding. To added the glitter I rubbed crystal effects along the edges after I sponged them with chocolate chip ink.

Ready for the next stop?? I know I am!! I loved the projects Cindy has created so be sure to check out her site called Heart's Delight Cards which she will be showcasing the stamp set Jolly Bingo Bits! Happy Stamping!!


Thursday, August 26, 2010

Throwback Thursday - Just Jawing

So I had decide to try something new on my blog. Since I know that you are all just like me and keep your stamps year after year I am sure you would still love to see projects made with them even after they are retired right .... we still need ideas right? So when I post on Thursday's I will be doing a throwback post and be using a set that has been retired. So for this first one I gotta use Just Jawing ... LOVE that set.

I colored in the eyes with my markers then added iridescent ice over the top of that to give it a little bling!! Then added a strip of ribbon ... love that thick ribbon!! I also used the scallop border punch as well as the heart punch.

And while I am at it here are 2 that were up on the display boards at convention that I thought were too cool!

LOVE LOVE this one above!! I am not sure who made it but it is the best use of this set I have ever seen!!! All the details are just perfect!

And this one is clean and simple which I love! I never would have thought to use this set for a Valentine! Too cute!! Not sure who made this one either. Happy Stamping!!

Tuesday, August 24, 2010

Display Stamper project #6- Paisley Print Pumpkin

This is my last card project using Paisley Prints ... a cute little pumpkin card.

I don't remember the exact measurements but it is a bit longer an thinner than your regular size card. It would be perfect size for a money card. And boy was at bow tiny!! Lovin' that small thin ribbon!! I did do the rock and roll technique on the pumpkins to give them more depth. I also used the Paisley Party wheel on the base. Happy Stamping!!

Sunday, August 22, 2010

Display Stamper project #5- Paisley Print Hearts Galore

Here is another one using the heart stamp from Paisley Prints.

This one was actually one of two that I really liked. It ended up sideways on the display boards but this is the actual direction it should have gone. I love how the bow came out, I heated it up a bit and it crinkled it just perfectly!! Happy Stamping!!

Friday, August 20, 2010

Display Stamper project #4 - Paisley Print Hearts

Back to the display board projects. I will finish up with the paisley set after a few more projects!

This one was a post it note holder. Very clean and simple project! Happy Stamping!

Wednesday, August 18, 2010

Two Toned

Here is a card I made for my secret sister last round.

This card shimmered and shined in real life and was beautiful!! I used my water color crayons to make the two toned effect on the flowers and the spritzed it with my favorite shimmer paint spray ... love that stuff!! Happy Stamping!!

Monday, August 16, 2010

Display Stamper Project #3 - Hearts Galore

I wanted to make another card using the hearts but not your traditional pink and red colors. So I made it using Daffodil Delight and Chocolate Chip.

Very very simple but I think it was cute. The card is slightly larger than your regular but I forgot to measure it before I sent it off, maybe 6x5 1/2. It still seems to be missing something maybe a few hearts by the tag. Oh well it has already been displayed. Happy Stamping!!

Saturday, August 14, 2010

Display Stamper Project #2 - Rustic Paisley Prints

Here is the next card ... I can't even tell you how many times I redid this card. I put it together in so many different ways but I finally came up with this rustic card.

I did roll the paisley prints wheel along the side but it's a little hard to see from the picture. Happy Stamping!!

Thursday, August 12, 2010

Display Stamper Projects #1

As you all know I was a display stamper for this past convention. Now that convention is over I can actually share the projects I submitted for the display boards. But first let me show you the board that actually had my name on it!! It was way cool to see it!!

The first grouping I will be sharing will all use the stamp set Paisley Prints. Now when I got this set I didn't like it ... and well I still don't like it!! I struggled a ton with making these projects BUT I did make all my projects work so I am going to share them first.

This one I made using the Tree. Now I do like how this card came out, very simple but easy to do at a workshop!! Hope you like it too! Happy Stamping!!

Tuesday, August 10, 2010

Technique Tuesday - Photo Wallet

As promised here is the tutorial on the scrap wallet from the blog hop. I hope it makes sense!!

You will start with half a sheet of card stock. Cut it down to 5 1/2 x 6 3/4. You will measure 3 1/4 and score on both sides. That will leave 1/4 in the center between each of the score marks. I would at this point decorate the outside cover before you add all of the envelope pieces.


Next you will get 5 coin size envelopes, they measure 3 1/8 x 5 1/2. So if you envelopes are a different size just adjust the base card stock to match the width and length of your envelopes.


Seal each envelope. Take 4 of the envelopes and slice along on long edge close to the edge.


Take those envelopes and tape them together by stacking them on top of each other. Make sure you tape them so the open end is all on one side.


Then tape them onto the inside right wallet flap.


It'll look like this once you have it taped down.


Take the last envelope and cut almost in half. I cut it at 2 1/2 that way on was larger than the other.


Tape them together.


Then tape it to the inside left side of wallet flap.


From here I am going to show my original project to get the last few steps. I'll be using this wallet to create a special gift for someone who shall not be named at this time!!

For the ribbon I just cut a slit on both sides of the center then feed my ribbon through. So it lays loosely around the outside of the wallet.


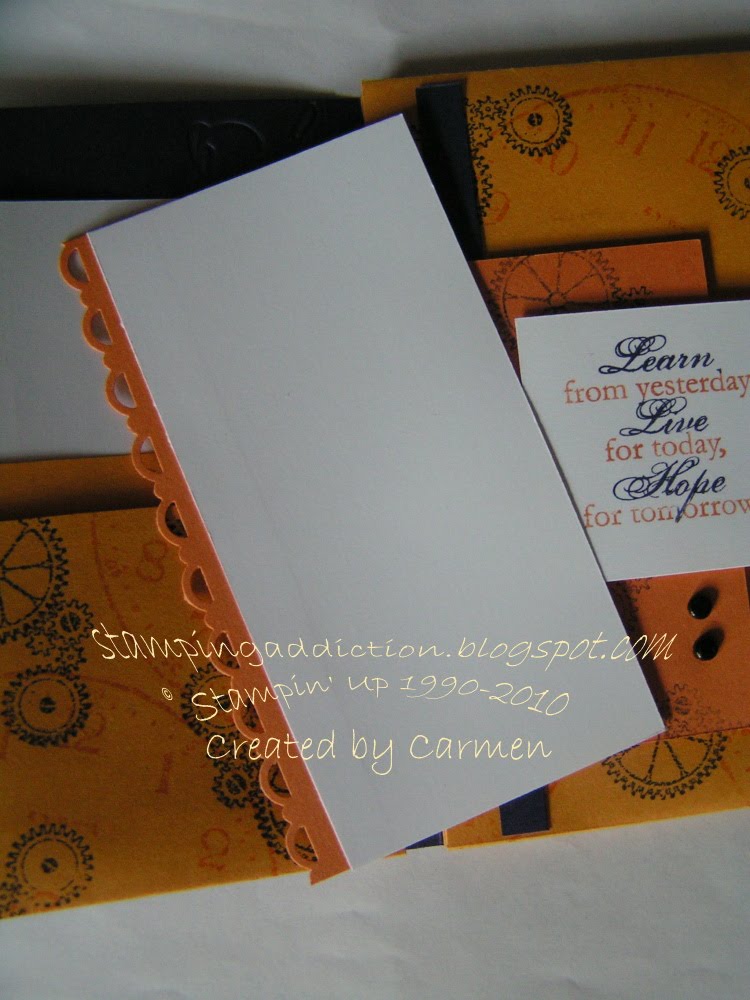
To create the blank pages that go inside the envelopes on the right side I cut white card stock to 3 1/4 x 5 3/8. I then cut tabs using the curly label punch which I then cut in half and taped down the the edges of the white cardstock. Lastly I added a bit of cardstock that I used the scallop trim border on. Make four of them to slide into each envelope. Don't forget to add your pictures!!


To created the pages for the left side I cut white cardstock 2 1/2 x 5 and added a bit of color by adding cardstock that I used the scallop trim border on. Slide those in as well after you have added your pictures!! Just FYI I would decorate the inside of the wallet before adding the pages so that it is still mostly flat.

If you happen to use this tutorial I would love to see what you make so please come back and link your project!! Happy Stamping!!
Related Posts with Thumbnails