Some of you know in real life I work full time as a retail manager so this is a really busy time of year for ... so between getting ready for "the event" on Friday and preparing for my Christmas Giftable workshop I've had very little time to make anything to share. I do still have a few spots available for my class so contact me if you want to take a spot!! I'll have some super projects to share!! But I did have some time to make this little beauty the other day.
I don't think I will be able to part with this card ... so I'm going to HAVE to make some more!! I just love all the things you can do with our Decor Element Stencils. First I sprayed all my pieces of cardstock with our shimmer paste to add a little extra sparkle to the background. Then I used one of the swirls from the Vintage Ornament set. I slathered stencil paste over it after I dyed it this beautiful red tone. If you look at the small picture on the right you will be able to see all of the texture it created. I also sprinkled dazzling diamonds over it before it dried. Last I added the ribbon and the sentiment!! Isn't it gourgeous!!!! Happy Stamping ... don't forget to check out our sale below!
Recipe: Stamp Set - Christmas Punch; Cardstock - Real Red, Whisper White, Specialty DP Christmas Cocoa; Accessories - Vintage Ornaments Stencil, Ruby Red ReInker, Frost White Shimmer PasteDazzling Diamonds Glitter, Red Taffeta Ribbon, Dimensionals, (non - SU) Stencil Paste.
Monday, November 23, 2009
Friday, November 13, 2009
Serene Snowflake
I like to participate in swaps, swaps and more swaps!! Here is one I did for Stampin' Addicts.
I hope that his set makes it into the main catalog next year! This stamp is great to use as a medalion and build up on the image with layering. In this card I used the build a brad for the ceter which goes nicely with the layers. Happy Stamping!!
Wednesday, November 11, 2009
Pocket Card
Here is a card I made last year that I never had a chance to share:
I've been trying to design my Christmas cards this year but can't find a design I like. My mojo has seemed to slipped off for a bit. Hopefully it will return sometime soon ... in the meantime Happy Stamping!!
Sunday, November 8, 2009
Altered Treat
When giving small gifts/candy I like to dress up the package a bit.
This was originally Lemon Ice Tea flavored Ice Breakers. I used the Eastern Bloom stamp set to decorate it up a bit. Happy Stamping!!
Friday, November 6, 2009
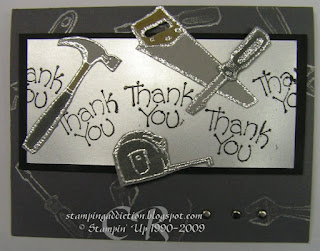
Totally Tool Thank You
I am usually in the need of Thank You cards especially with helping run a Cub Scout pack. Here is one I made up using the Totally Tool set.
I embossed each tool on gray cardstock and when I cut them out I colored the handles in with markers. A nice and simple masculine Thank You card. Happy Stamping!
Tuesday, November 3, 2009
Shimmer Paint Spray - Almost a Technique Tuesday
I had completely intended to show a tutorial on how to make the shimmy paint spray but apparently I saved the pictures to the unknown abyss. So instead I'll just share how to as well as a card I made for my Husband's Grandmother for her birthday.
If you look closely you will see that the yellow and vanilla cardstock pieces are shimmery. Basically to make a shimmery spray you mix rubbing alcohol with the shimmer paints (I made one for each color) into a small spray bottle. I used the mini sprayers you can get in a 3pk at the "guys" craft store. You only need a few drops to the rubbing alcohol. You will need to shake it up each time you use it because it will settle to the bottom. I do have to give a small warning ... be careful where you spray because my desk, scissors, and cat are now quite shimmery!! Happy Stamping!
Monday, November 2, 2009
Giraffe Card
I have a compulsion to buy stamp sets ... I think I've told you before. There was absolutely no reason for me to buy Animal Stories. It wasn't a fun boy type set ... yes I know it's animals but it has more of a baby feel to it and my boys are waaay past that stage. Yet I still had to buy it ... it's been a fun set to use.
I made this card as a thinking of you kinda card but you could easily use it for a baby card. As usual I kept it simple, just added a bit of DSP and some hemp and it was done. Just my kinda style! Happy Stamping!
Subscribe to:
Posts (Atom)