Friday, January 28, 2011

Stampin' Addicts Sale-A-Bration Blog Hop - Extreme Skateboard


Welcome to Stampin' Addicts Sale-A-Bration bog hop!! Right now Stampin' Up is offering a super deal with every $50 dollars you spend you get to pick a free set out of the Sale-A-Bration catalog. I wait for this sale every year!! Those of us over at Stampin' Addicts put together this fantastic hop featuring sets from that catalog.

If you are following the hop in order than you have just come from Yapha's Rubber Stamping & Card Making where she features the set Bear Hugs, she always has the cutest things!! I am sharing creations I made using the Extreme Skateboard stamp.

This first card I created was more typical of this set and a more traditional layout. This was my son's favorite card ... he thought it was pretty cool!


If you noticed the skateboard figure faces the other direction. To do this I inked the stamp with my marker and stamped it onto the clear sheet I use with my stamp-a-ma-jig and then transferred that onto my cardstock. I then used my aqua painter to spread the ink to fill in the image. It gave it a cool texture!

This next card is non-traditional and NOT my usual design or style but I had a lot of fun making it!! And what kind of skater girl wouldn't love it?!?


My son wasn't too sure about this one ... he said it was too girlie. That was the point so mission accomplished!! On the base of the card I used my Lots of Love letterpress and if you click on the picture for a larger view you can see it better. I also used the set Dreams du Jour.

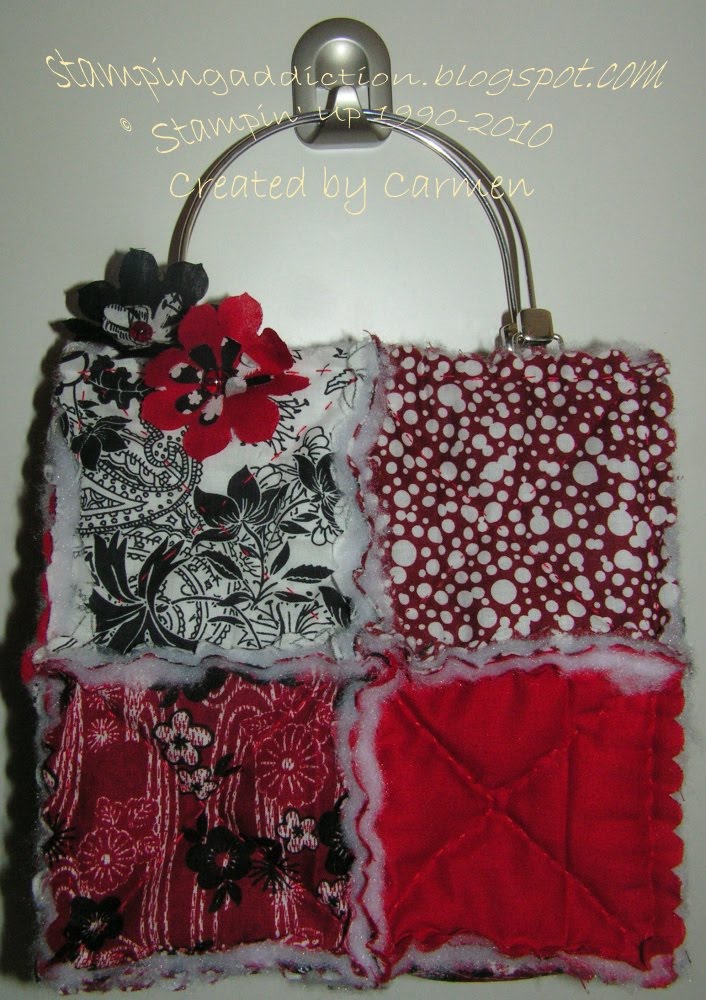
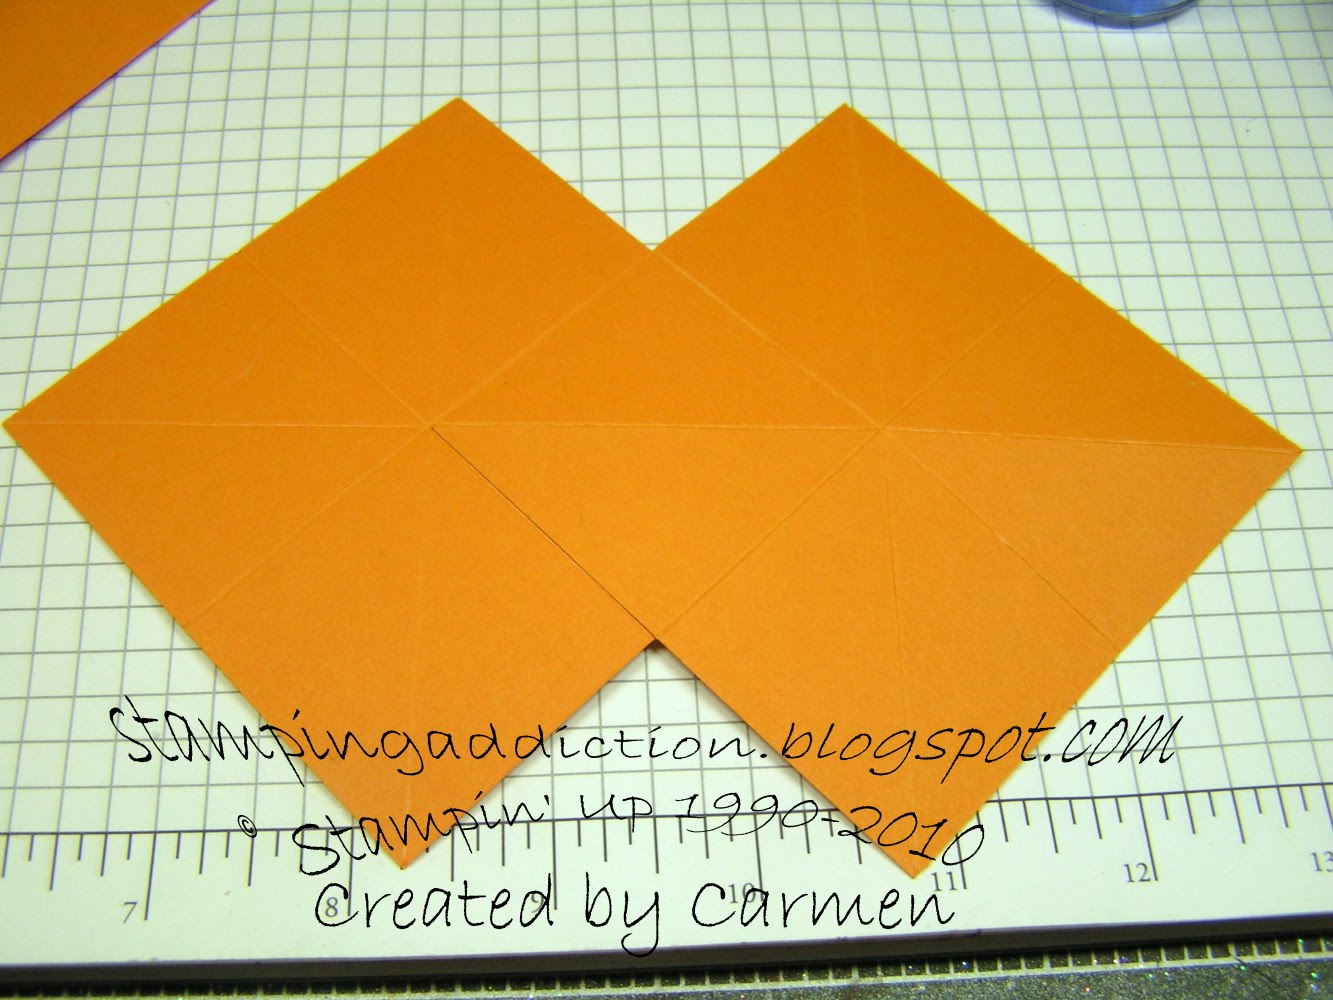
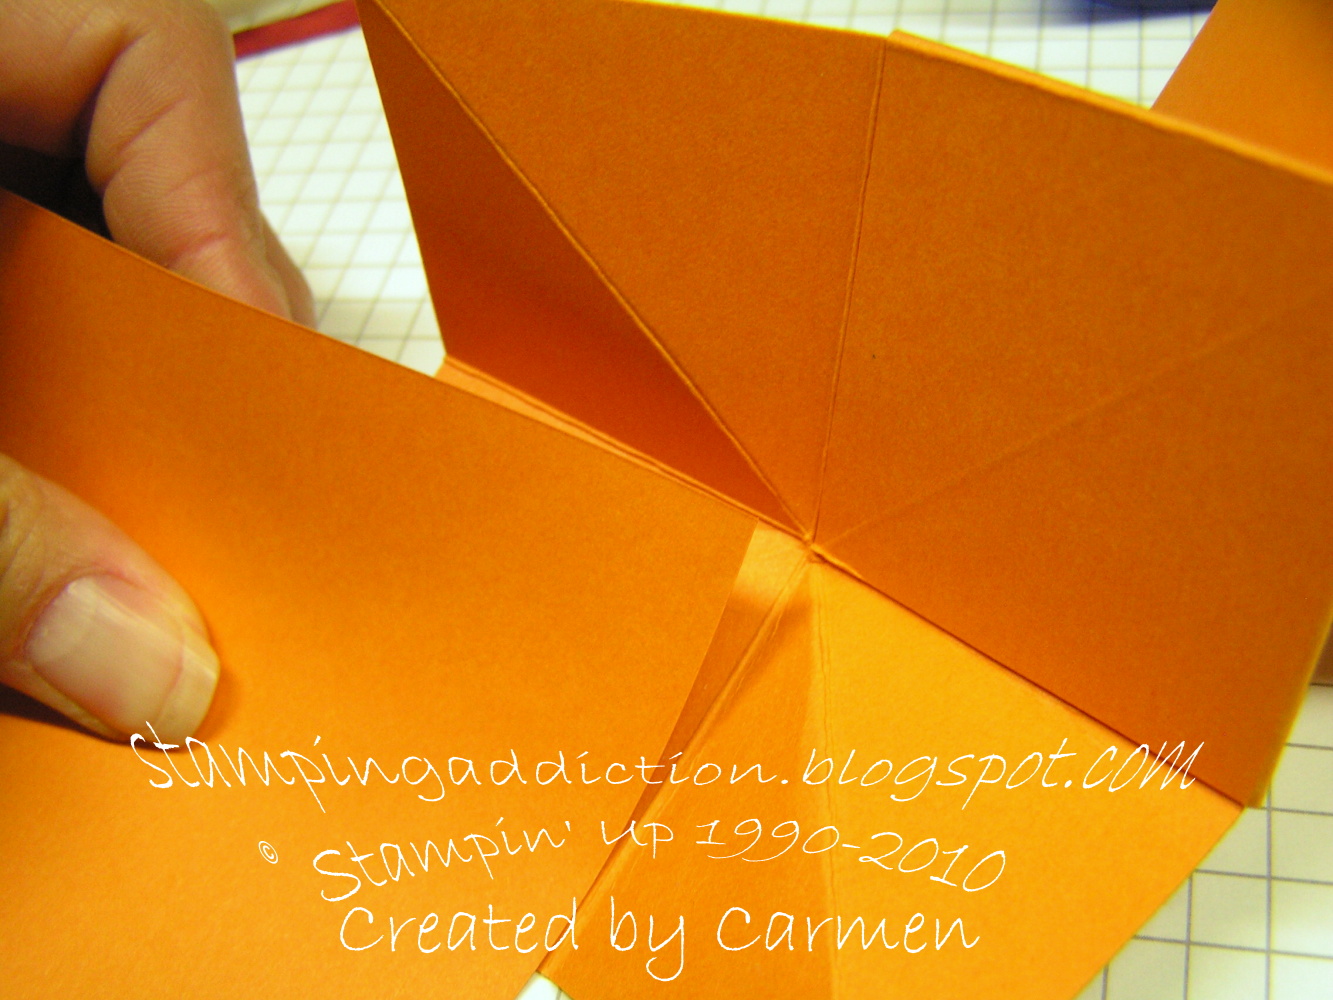
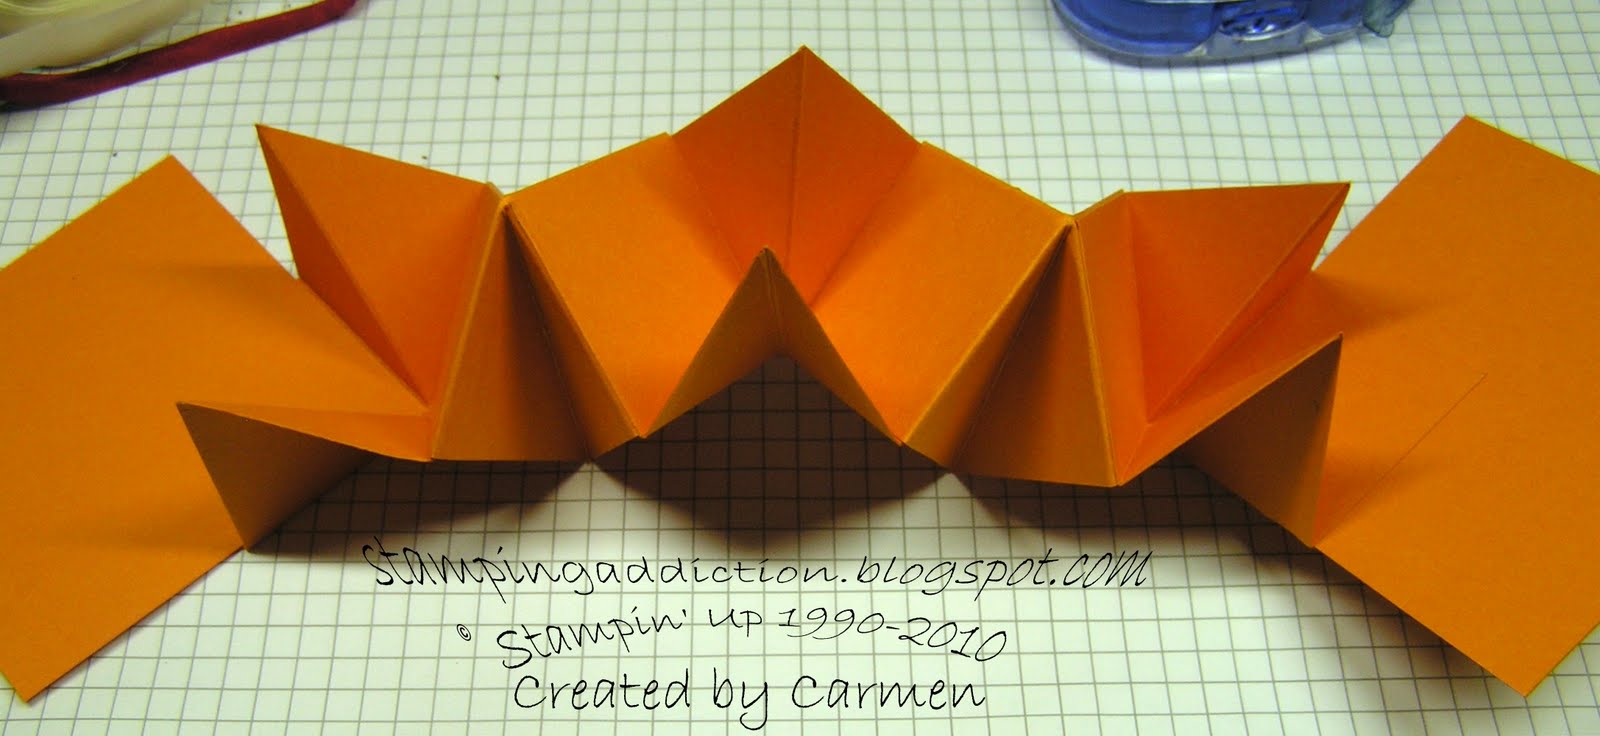
This is the first and last project I created for this hop and again something I created by stepping out of the box a bit.


It's a mini expandable file folder holder! Way cool huh!? I plan on writing advice for each "category" for my son. To add the flourishes on the end of the tabs I just used my stamp-a-ma-jig to add the bottom part of the three little words stamp. I also used the Live, Laugh, Love stamp for this project as well as Three Little words which are both sale-a-bration sets.

I hope you enjoyed the projects I shared and don't forget to continue on the rest of the blog hop!! The next stop is Holly's Ink Paper Stamps where she is featuring one of my favorite sets Forest Friends.


Happy Stamping!!

Wednesday, January 26, 2011

Cat in the Box and some Tags

I have a bedroom that I use for my stamping room (it doubles as a guest room) and my cat enjoys being in there when I am stamping. Most of all Ash *loves* to nap in his Stampin' Up! box while I'm busy trying to be creative. Check him out:


Those small boxes sure pack a lot of things but honestly I don't know how he fits in it!! Next is a few little gift tags I made.


Don't forget to come back on Friday to check out our Sale A Bration blog hop with all the Stampin' Addict gals!! Happy Stamping!!

Monday, January 24, 2011

Simple Stepped Up

As promised I took the card from my last post and added a few things to step it up a bit.

I added the whisper white piece that I punched with the scallop ribbon punch to one side. Adding the one piece along the side brightened up the card quite a bit. To blend in the center I sponged my versamarker along the sides of the card and embossed some iridescent ice to it. That tied the whole piece in together and really made it sparkle. Just by adding a few things you can really step up a card! Happy Stamping!!

Saturday, January 22, 2011

Simple Bleached Card

Over the next few weeks I am going to work on how my labels are set up. Hopefully they will be a bit more organized .... and a few less labels. So look out for that in the next few weeks. I hope to do it all in just one big move so not to disrupt anyone who actually reads my blog!!

Here is a simple "almost" one layer card.


I stamped the Medallion stamp on my chocolate chip cardstock with bleach. I stamped a second one onto white cardstock with chocolate chip ink then punched out the center and lastly added some iridescent ice. Added some ribbon and a bit of sponging around the edges and the card was done!! My kind of easy and the card is simple but elegant.

On my next post I will show how to take this card and step it up a notch to make it stand out even more. Happy Stamping!

Thursday, January 20, 2011

6x6 Scrapbook Page

Here is a page I made at pone of my fall workshops.

I got the idea for this page right out of the catty and it could easily be made into a card. The flower I stamped in ridinghood red and then used my clear embossing powder over that. It really made is shine. Happy Stamping!!

Tuesday, January 18, 2011

Calendar Step Up

To go with the last two posts was this desk calendar. In order to step it up I added a cover and decorations to it and I think it came out super cute!!

I ran a border along the top and used my dotted scallop ribbon punch. The flowers were made using the Blossom Party die, my big shot and some felt. As with the card I shared the other day I attached the flowers with brads. It sure made my plain calendar stand out! Happy Stamping!!

Sunday, January 16, 2011

Border Card

Here is the card I made that accompanied the flower pin.

Just a simple card that was decorated on the bottom only. I used the Flower Blossom die to cut out the flowers. I crimped the blue piece and used my dotted scallop ribbon punch. I attached the flowers using brads. Happy Stamping!!

Friday, January 14, 2011

Flower Felt Pin

This little pin is super quick and fun!

I used the blossom party die to make this pin out of felt. On the back side I just attached a pin back. Happy Stamping!!

Wednesday, January 12, 2011

Countryside

Just a simple card made using the truck from countryside.

Happy Stamping!

Monday, January 10, 2011

Fabric Rag Quilt Bag

Awhile back I shared the swap bag I made for convention. Here is another one I made for a gift.

My secret sister that I made if for absolutely loved it!! I think I am going to make another one just like this one for my Mom who's favorite color is red. Happy Stamping!!

Saturday, January 8, 2011

Simple Pop Up Card

Here is the card I made while doing my pop up tutorial.

It looks prettier in real life and it sparkles a ton!! Happy Stamping!

Tuesday, January 4, 2011

Technique Tuesday - Pop Up Card

Here is the tutorial for my pop up card I showed in the Blog hop this past weekend. I apologize for the color of the pictures but I have terrible lighting right now and couldn't get the colors right in my photo editor.

Start with 7 pieces of card stock that measure 3 1/2x3 1/2. Set 2 pieces aside. The other 5 pieces you are going to score. Start by scoring from corner to corner on both sides.


Then score on both sides center to center.


After all the scoring your piece will look like this.


Tape one corner box side to the corner box side of the second piece. Do this until all 5 pieces are taped end to end.


Now get the 2 pieces you set aside that are not scored. Tape one end to the outside corner end of the row of 5.


Flip the paper so that the inside is showing and start folding the ends in until you have created a square.


Keep folding the corners in.


Do this until the entire row is folded up.


Take the last piece of cardstock and tape to the inside of the corner square.


Taping the end down


This is what it looks like when the card is open.


Here is what it looks like when the card is folded closed. It does have a bulk to it which is why you need a belly band or ribbon if you want.


Thursday I will share with you the card I made to complete this tutorial. If I missed anything or you still need some help figuring it out just let me know!! If you do use this tutorial please link back the project to me so I can check them out!! I love seeing what you all make with them. Happy Stamping!!
Related Posts with Thumbnails