For today's Technique Tuesday I will be going over the Chalkboard technique. It's a simple technique and not very time consuming.

To start you are going to need your chalks, q-tip, stamp image,
cardstock and your white craft pad. The image turns out better when you use a dark
cardstock color.

Stamp out your image onto the
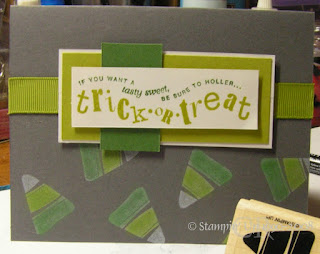
cardstock where you want your image. In this case I wanted several images to run along the bottom of my card.

Using your q-tip add color to the image based on your color design.

I wanted several colors on my images so I added an additional color after applying the first. Once you have your image(s) colored to your specifications you are all set.
Here is my finished card. I wanted to make a Halloween card and I love candy corn corn, so I thought this would be cute. It came out close to what I had in mind. I know candy corn isn't traditionally in green colors but there are so many new flavors of candy corn now so it very well could be. I almost made it in red tones since I just picked up a package of red candy corn, caramel apple flavored and they are good too! BUT since I had green scrap on my desk that was the color I went with.
Hope you found the tutorial useful! Leave me a comment if there is a technique you would like to learn.
 Recipe: Stamp Set - Tasty Sweet; Cardstock - Basic Gray, Garden Green, Kiwi Kiss, Whisper White; Ink - Craft White; Accessories - Garden Green Marker, Old Olive Marker,Old Olive Grosgrain Ribbon 5/8", Dimensionals, Chalk


 The other day I mention that my little one had a Birthday and with Birthday's come party's so I had to make up a bunch of invitations. He decided he wanted to have another bowling party so I had to bust out a long long since retired set to make his invites, a set called Have A Ball. (Yes I keep each and every set I have ever gotten BUT I still use them!) I kept them super simple since I made over 20 of them. Happy Stamping!!


 A little too much to drink . Someone was pretty creative in designing these pumpkins don't think I have ever quite seen anything like this. Oh and I got this great card from a close friend of mine.
 The elements of this card really came together for me and was actually inspired by a 3-d project I had made, I'll post that one tomorrow. It was rather easy even though it doesn't look that way. So what do you think?


