There is this bunch of great gals I get to swap with and we all have become great friends. We do an annual Christmas swap and this was the card I made.
I love that Northern Flurry die and I have used it on a ton of projects!! After I embossed it I sponged on some riding hood red over it to add a bit of color. I also stamp some snowflakes from the set Serene Snowflakes. I added the saying from Christmas greetings. Lastly I added a few rhinestones, some shimmer paint, and ribbon. Happy Stamping!!
Tuesday, November 30, 2010
Sunday, November 28, 2010
Christmas Collage
The other day I shared my Fall Collage card and said it was inspired by another card I had made; well this was the original card. I made it for my secret sis.
It's a non traditional Christmas card but I liked it!! She did it! The main image I stamped with staz on and then spritzed it with shimmer spray before I stamped it to give it more of a shiny tone to it. The stamp set I used is Serene Snowflakes and the words were from Christmas greetings. As the accent I chose black which really made everything else pop!! Happy Stamping!!
Friday, November 26, 2010
Inspired by Nature
I'm not sure if I ever admitted this but this set, Inspired by Nature, I originally got free at convention a couple of years ago and I hated it!! I was so going to give it away but for whatever reason I didn't and I'm glad I didn't because it is one of my favorites sets now.
So here is a card I made a few weeks back at my October workshop. I sponged on the different colors on the stamp before stamping it onto the paper. The base layer is embossed with the Square Lattice folder. BUTmy favorite part of the card is the ribbon. If you click on the picture to the right you will see that it is two toned. I made it that way with my markers. Neat huh?!? I also misted it with my log cabin smooch spritz at far distance to get a thin spray. Happy Stamping!!
Wednesday, November 24, 2010
Turkey Place Setting Tag
I got a smaller version of this Turkey as a SS gift last year and just had to make some of my own.
Isn't he just the cutest?? I plan on using him to hold photos but he would be perfect for a name place setting at your family Thanksgiving gatherings. I used the 2 3/8 scallop punch to make his tail. The 1 3/4 punch for his body and the 1 circle punch for his head. I free handed his nose as well as hat. If I would have had google eyes I would had done his eyes with those instead. His legs are the silver part of the metal clip. I added some DSP to the bottom of the clip to decorate it up a bit, tied some ribbon and he was done. The DSP I used was from the Hostess pack.
I hope you all have a wonderful holiday with your Families. Happy Stamping!!

Monday, November 22, 2010
Online Spectacular November 22-30,2010
Don't miss out on the Online Spectacular, there are some fantastic deals on stamp sets, ribbons, accessories, digital downloads, decor elements and free shipping for orders over $150 placed through my demonstrator website!! Click on the picture below for the PDF of all the sale items!!
Be sure to take advantage of this sale before November 30th. Happy Stamping!!
Demo Night
There are several demos who have become the best of friends that live in the Flagstaff area and we try to get together every once in awhile and have demo night. I hosted the one we had in October and this is the project that we made.
I got the idea from Deb at Artfelt Impressions who I think cased it from someone else. We punched out the flowers using the Boho Blossoms punch and the leaves were made with ribbon. The grass in the background is the stamp from Inspired by Nature set. If you click on the picture you will see the Chocolate Chip piece was embossed using the Square Lattice folder. Lastly I spritzed it with the Log Cabin smooch spritz. Happy Stamping!!
Saturday, November 20, 2010
Fall Collage
This card was inspired by a Christmas card I did (I haven't shared it yet) and thought it would look cool using the French Foliage set from the mini catalog.
I base I used a bunch of the stamps in a variety of colors and angles to get the collage. When I made the leaves I inked up my stamp and then spritzed the stamp with my shimmer mist prior to stamping on the paper. It gives the leaves a nice shimmery effect. If you click on the picture to the left you can see it. I added the crimped piece to the back along with a few other cardstock pieces. Lastly added some ribbon and the clip. It's a great card for this time of year!! Happy Stamping!!
Thursday, November 18, 2010
Throwback Thursday - Turkey Talk
Here is a little gift packaging I did for a friend; it uses some of my old stamp sets.
The turkey is from Turkey Talk on of my coveted Thanksgiving stamp sets. The saying and the DSP are one last years catty. The DSP is Tall Tales and the saying is from Holiday Best. I colored my turkey with the watercolor pencils and blended them in with my aquapainter. Happy Stamping!!
Sunday, November 14, 2010
Decor Stencils
This was another one from my archives that I didn't have a chance to share last year.
I made the tag using the decor stencil Vintage Ornaments I. I used the flourish and spread paste on it, took off the stencil and then let it dry. I then let it dry before I cut it out. It added a nice touch to the glass. Happy Stamping!!
Friday, November 12, 2010
Falling Leaves
This is actually a card from my archives that I didn't share last year. This set was in a mini catalog but made it into the big catty this year. It's called Autumn Splendor.
I kept the base of this card simple but the leaves I put a lot of color and texture. I embossed the leaves then sponged on different fall colors onto the leaves. When I attached them to the card I curled the edges to give it the leafy feel. Happy Stamping!!
Wednesday, November 10, 2010
Display Stamper Project #8 - So Many Thanks
Here is the scarpbook page I made using So Many Thanks.
I ran a long row of the stamp down the left side. I used my stampin-majig. It's a very simple page but I didn't want to take away from the picture which is a picture of the middle section of the traveling replica of the Vietnam Veterans Memorial Wall. To top off the page I added the double ribbon bow. Happy Stamping!
Monday, November 8, 2010
Display Stamper Projct #7 - So Many Thanks
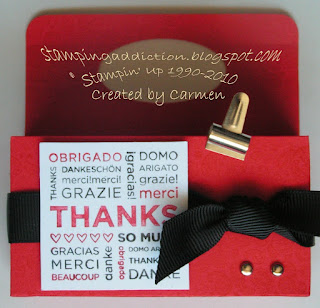
Here is my second 3-d project I created using the So Many Thanks stamp and probably my favorite from this grouping.
I made it with my big shot and box #2 die. I left the lid open to make it into a handle. To get the multi color in the stamp I just colored in the words with my markers before stamping. You can fill it with candy or add some 3x3 cards to the inside or a ton of other things. Happy Stamping!!
Saturday, November 6, 2010
Display Stamper Project #6 - So Many Thanks
Ok now that Halloween is over just wanted to share the last couple of display stamper projects I did. So here is the next one using the So Many Thanks stamp.
I created this with my big shotand the pizza box die technically it is called the bitty box die but to me it looks like a pizza box. Pretty simple huh? But very cute!! Happy Stamping!!
Subscribe to:
Posts (Atom)