Showing posts with label Just Jawing. Show all posts

Wednesday, May 30, 2012

Happy Birthday Zombie Style!


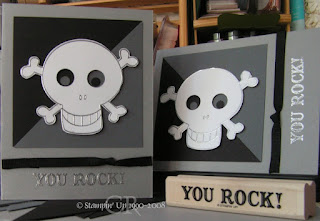
As you all know I have a thing for zombies and skulls and well so does the rest of my family.  I must have rubbed off on them!! Well my little one turned 12 at the beginning of the month and I was trying to decide what kind of card to make him and I came up with this rockin' card!!  It uses the set Just Jawing that I will forever keep and use even though it has been long since retired as well as the set Extreme Elements.  He loved this card almost as much as I did!!  Happy Stamping!!

Thursday, August 26, 2010

Throwback Thursday - Just Jawing

So I had decide to try something new on my blog. Since I know that you are all just like me and keep your stamps year after year I am sure you would still love to see projects made with them even after they are retired right .... we still need ideas right? So when I post on Thursday's I will be doing a throwback post and be using a set that has been retired. So for this first one I gotta use Just Jawing ... LOVE that set.

I colored in the eyes with my markers then added iridescent ice over the top of that to give it a little bling!! Then added a strip of ribbon ... love that thick ribbon!! I also used the scallop border punch as well as the heart punch.

And while I am at it here are 2 that were up on the display boards at convention that I thought were too cool!

LOVE LOVE this one above!! I am not sure who made it but it is the best use of this set I have ever seen!!! All the details are just perfect!

And this one is clean and simple which I love! I never would have thought to use this set for a Valentine! Too cute!! Not sure who made this one either. Happy Stamping!!

Thursday, June 10, 2010

Just Jawing?

Just Jawing is retiring?? WHAT?? I have no idea what I'm gonna do ... well actually I do I'll just keep making cards with it since it is my favorite set of all times!! It's the only stamp set that has it's own label! Since it is retiring and IF you haven't gotten it yet then hopefully this card will get you to change your mind!

The colors here are Chocolate Chip and Ruby Red. I added iridescent ice to the eyes to make them pop as well as the edges of the card, some chocolate chip ribbon and some black hearts. I cut the scallop circle out with my big shot. I think this is my favorite card using Just Jawing and it was just a 5 minute card!

Be sure to join Stampin' Addicts on our Last Chance blog hop starting tomorrow. You can join the hop from my site. See you tomorrow and Happy Stamping!!

Wednesday, September 16, 2009

Just Jawing Some More

We all know how much I *love* the set Just Jawing. If you don't you can always look at these older posts to get caught up on the drama. Matter of fact it's the only stamp set that has it's own label on my side bar!!

The Sassy Stampers blog group has been through my Just Jawing addiction since we started that group so I thought it was fitting to include in the package a card made using this stamp set. For the life of me I can't remember what the challenge was for this card. But I think it was for the birthday card challenge, but don't hold me to it.

I almost kept this card ... I think it's perfect!! Happy Stamping!

Monday, September 14, 2009

Another matchbox ...

Here is another one of my matchboxes. I knew how much my SS loved these matchboxes but could not get them in Australia so I made her this one:

I used the cherries from Just Jawing (my favorite set!!) and some scraps of Rockabilly DSP. I also included many different matchbox pieces so that could make her own!! Happy Stamping!

Friday, May 8, 2009

Rockabilly - Parade of Papers Blog Hop - Blog Candy Winner Added

Welcome to Stampin' Addicts first ever blog hop! Each stop along our Parade of Papers tour features projects made with Stampin' Up's Designer Series Paper created by some talented Stampin' Up demonstrators. Throughout the month of May buy three packs of Designer Series paper (including our Specialty Designer Series paper) or 12" x 12" textured card stock and get one FREE! We want to celebrate with you by sharing many wonderful ideas showcasing all of the designer series paper Stampin' Up! has to offer.

This is your 1st stop on the Parade of Papers and when you get to the end you'll be given the link for the 2nd fantastic stop, but don't stop there be sure to check out all 24 stops. You can find more info on the blog hop at Stampin' Addicts.

I have lots of projects to share with you using one of my favorite specialty papers Rockabilly! It's right up there with my favorite stamp set Just Jawing, which I also used!! This paper set has a special added touch to it in that it has a glossy finish.


The first one I want to share with you is little project I call a Flip Scrap Card.


This little beauty folds down to 5x6", a great size for a card but when you open it completely it is 5x12".


Each flap opens revealing another page. You can add pictures, quotes or journaling, it all depends on what you want to do. It may seem like it use a long of paper but it only took 1 sheet of DSP, and half a sheet each of colored cardstock.

Recipe: Stamp Set - Just Jawing; Cardstock - Rockabilly Specialty DSP, Kiwi Kiss, Riding Hood Red, and Whisper White, Basic Black; Ink - Riding Hood Red, Kiwi Kiss, Versamark; Accessories - White Embossing Powder, Clear Embossing Powder, Versamarker, Real Red Pen, Old Olive Pen, White Gel Pen, 5/8" Old Olive Grosgrain Ribbon, Dimensionals, Scallop Punch, Scallop Border Punch, 1 3/8" Circle Punch, Handheld Circle Punch.

I wanted a fun boy/tween card and this one did just the trick.


It's bright and fun. The glossy DSP adds just the perfect touch giving it the Rock & Roll feel to it.

Recipe: Stamp Set - Just Jawing; Cardstock - Pacific Point, Rockabilly Specialty, Going Gray, Basic Black; Ink - Versamark; Accessories - White Embossing Powder, Black Embossing Powder, White Gel Pen, Star Punch, Basic Gray Taffeta Ribbon.


This next one is perfect way to spruce up those gift cards we give; especially for a teenager.


The belly band slips around to keep the gift card closed.

Recipe: Stamp Set - Just Jawing; Cardstock - Going Gray, Rockabilly Specialty; Ink - Riding Hood Red, Versamarker; Accessories - Basic Gray, Black Shrinky Dink, Black Eyelets, Glue Dots, Riding Hood Red Taffeta Ribbon, Slot Punch, Heat Gun, Glue Dots.

Next here's a girlie card ... as a matter of fact this is the one my Mom is getting for Mother's Day ... ssh don't tell her.


This one I actually had a hard time trying to get just the way I wanted but finally it all fit together.

Recipe: Stamp Set - Great Friend; Cardstock - Baja Breeze, Rockabilly Speciality, Whisper White; Ink - Pink Pirouette, Baja Breeze, Riding Hood Red, Versamarker; Accessories - White Embossing Powder, Pretties Kit, White Grosgrain Ribbon, Glue Dots, Dimensionals.

My last project is this rockin' 6x6 scrapbook page.


I just love this skull and it works perfectly with this sheet from rockabilly! I want a more masculine eye so I punched the hearts out with the circle punch and layered behind it with basic black paper and added the kiwi kiss pupils with the handheld punch. To give him a bit of color I watercolored the bones to match the paper.

Recipe: Stamp Set - Just Jawing; Cardstock - Rockabilly Specialty, Kiwi Kiss, Whisper White, Basic Black; Ink - Kiwi Kiss, Versamarker; Accessories - Black Embossing Powder, Black Eyelets, Old Olive Grosgrain Ribbon, Basic Black Grosgrain Ribbon, Dimensionls, Aquapainter, 1/2" Circle Punch, 1/16" Handheld Circle Punch.

Can you believe after doing all of these projects I still had 9 full sheets, 2 2/3 sheets, and some scraps left over. These paper packs are a FANTASTIC value. If you've enjoyed the projects on this stop be sure to leave me a comment and enter your chance to win a sample of Rockabilly Specialty paper. Comments are now closed. I picked a name very scientifically and had my son pick a number from 1-90 and he picked 6. So Jyll email me and I'll send you the sample. Thank you everyone for playing a long with us!!

I'm glad you visited my stop on this Parade but don't forget to take the next stop and check out what Rhonda from The Stampin' Bunny has to share. In case you want to work the circle in the other direction check with Beth of Stamp Me a Rainbow, she's technically the last stop on our Parade. The Parade of Papers ends at midnight on May 10th so be sure you aren't left out .... Happy Stamping!!

Monday, April 27, 2009

My Fav Stamp Set

Can you guess what it is??? LOL here is yet another card I made using the Just Jawing Set.

After I sent this little card out I thought I should have cut around the skull and layered him so he would pop a little more but he works just the same!! The eyelets I made with my piercing tool and white gel pen. Happy Stamping!

Wednesday, December 31, 2008

One More for '08

Well I couldn't let the year end without sharing one more card using my favorite set. Can you all guess what it is? I did a weeks long showcase using the set a few months back ..... need a refresher? You can find it here.

I've been waiting to make this card, I've had it sketched forever but had to wait until I got the Gratuitous Graffiti background stamp. I kept putting it on my list but taking it off. So this month I finally got it and now it's also one of my favorite stamps too!!


Pretty cool huh!?!?!? I was going to do it more masculine but I forgot to mask out the eyes and I really didn't want to cover the eyes with punched out stars so I just went with it. But then I decided it needed a bit more bling so I added glitter to it.
I really like it with the chunky glitter. Definitely going to have to make some more cards for '09.

I hope that you all have had a memorable '08 and that even better things will come to each of you in '09. After all it's a year of change . But I won't change my mind about this set ... LOL!!! Happy Stamping!!

Monday, October 6, 2008

Another Just Jawing

I know I said this was my favorite set a few times so I had to pull it out again to make a card for a manly swap I am in. The first set I did got eaten by the post office. Actually I'm not really sure what the PO did with them as all the hostess got was a shredded envelope with a note that said they were sorry for the handling of the mail and that the contents were missing, sorry for the inconvenience. It's was a good thing I had done my swaps early because it allowed me to make another set (did different ones the second time), plus it was only a 5+1. I never did get my other swaps back even with them being in Ziploc bag with my address on it. Anyways here is one of the new cards I made...
I couldn't decide which orientation I liked the best so I made a couple of each.
Recipe: Stamp Set - Just Jawing; Cardstock - Going Gray, Basic Gray, Basic Black, Whisper White; Ink - Versamark; Accessories - Silver Emboss Powder, Black Grosgrain Ribbon, Dimensionals, Circle Punches

Saturday, September 20, 2008

The last ...

card I made using the Just Jawing set for now. This one is also has a rock star kind of feel to it just a bit more mellow. The blues definitely soften it up a bit BUT you could still use it as a masculine card. I made this card for a new catalog swap I was in and the quality of the swap was high caliber, if you like I can share them with you.

The gray piece is done using the big shot die Top Note. This die is soo awesome it can be used in many different ways and really adds a nice look. My son is completely fascinated with using my big shot and likes to use it. I think he was surprised I let him use it all by himself as most of my "tools" are of limits unless I am right next to him. He is actually pretty good about using my stuff properly especially for an 8 year old. Hope you like it!!
Recipe: Stamp Set - Just Jawing; Cardstock - Baja Breeze, Going Gray, Whisper White; Ink - Versamark, Baja Breeze; Accessories - Black Embossing Powder, Black Brads, Black Grosgrain Ribbon, Dimensionals

Wow! After just starting this blogger thing I have over 1000 hits to my site. I know that's the whole intent of having a blog, I just thought with all the other blogs would mine even get noticed. So I decided to do a little blog candy. Now the candy is some things I've had in my prize box, oldies but still goodies. Burst into Bloom stamp set (new, I did mount it) and a sampler pack of Tudor DSP with some buttons. If you want to be in on the card candy just leave me a comment and I will pick a winner on Friday the 26Th. The more comments you make the better your chances :) Happy Stamping!!

Friday, September 19, 2008

Another Just Jawing and a new special

I must have used Just Jawing set for a bunch of my Halloween swaps I did. To me it's just to cute!! So this one I did as a rock star version!! I dirtied up the skull a bit to give it a bit more dimension. Recipe: Stamp Set - Just Jawing; Ink - Versamark, Sahara Sand, Tangerine Tango; Cardstock - Tangerine Tango, Basic Black, Whisper White; Accessories - Black Embossing Powder, Black Brads, Dimensionals.

Stampin' Up! is offering a new Decor Elements design just for Halloween!! It's of this great Spooky Spider and it comes in 3 different sizes. This was a project they showed during convention and I thought it was just fabulous. I will be making one of these myself just as soon as I have some time!! The flyer and info is located on the right hand side of my blog. These great jars can be bought at WalMart for pretty cheap.
Lastly here is a little 3x3 I made using the Scary Skulls wheel. This is like my second time making a 3x3 and I'm sure they will get better the space just seems so small.

Recipe: Cardstock - Real Red, Basic Black, Going Gray; Ink - Real Red; Accessories - Circle Punch, Distresser, Black Brads

Thursday, September 18, 2008

A week of Just Jawing

Since I have a small fascination with the Just Jawing set I thought I would share with you the cards I have made so far using this set. I find that this set is much more versitle than most people think. With this card I decided to go girlie and use the cherry stamp as the background. I made this card for a halloween swap I am in but it could be used for all occasions.

Recipe: Stamp Set - Just Jawing; Cardstock - Riding Hood Red, Basic Black; Ink - Riding Hood Red, versamark; Accessories - Black and White Embossing powder, Black Grosgrain Ribbon, Micro Beads, Crystal Effets and Dimensionals.

Tuesday, September 16, 2008

My Favorite Stamp Set

I know I have said this several times but this one IS my favorite stamp set at least for this month.This set one the first one I just HAD to have out of the new catty!! It's mainly themed for girls but I had made several cards going with a more manly design. Here's one of them:
So what do you think? I like how the brown and blue go together so well.This week I will be showing several different cards with this set.

Recipe: Stamp Set - Just Jawing; Cardstock - Baja Breeze, Chocolate Chip; Ink - Chocolate Chip; Acessories - Crimper, Chocolate Chip ribbon, Circle Punch.

Well I installed new browser firefox thanks to a suggestion from the wonderful Belindaking from SCS. This browser is the best!! So in the next week or so I can actually update my demonstrator website, I didn't even know there was so much difference in browsers and boy I have to tell you I have been out BUT not anymore!!

Tuesday, September 2, 2008

Technique Tuesday - Embossing

Here are the cards I made using the gift card tutorial last week that I promised I would show. Just Jawing is one of my absolute favorite sets!! I like the set is designed sort of girlie with hearts and cherries BUT it's also easy to alter to a more manly style too. I'll be using this one ALOT!! Actually I've been stamping with it all weekend making some swaps.


I wanted to share a bit of embossing with you, a real super easy technique that adds just that extra bit. To start off you need to stamp your image using versamark on your cardstock. If you look real close you can see a clear image of the skeleton on the paper.


Sprinkle on embossing powder over the image. You can pick many different colors depending on your choice. After you have sprinkled the embossing powder over the image you would need to tilt the paper over the powder pal to get off any extra embossing powder. The excess powder would then go back into your container. I always do this before I move on to the next step because I am notorious for making a mess. Which usually involves having the embossing powder all over my craft room, myself and the cat. And the cat does NOT like to be glittery.


Next you will want to heat your embossed image using your heat tool.


It should look like this after you have heated it. Hope you like the tutorial!!
Related Posts with Thumbnails