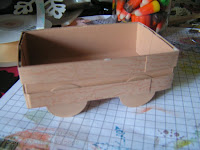
 Start with a base which measures 4 1/4" x 5 1/2" ( your standard size card front). You will score around all four sides at 1 inch.
On all four corners of the 4 1/4" side up to where the score lines meet. Hopefully you can see the cut lines in the picture to the right.

Crease all of your fold lines and you will start to see how the base will form.

I found the multi adhesive is the best to put the base together. Place glue on the FRONT side of each of the four corners. This is important if you are going to use a DSP.

Fold in each tab to the inside of the base. This will make the inside of the wagon. To make the slats I used the weathered BG with Really Rust ink on a card front. Then cut strips 3/8"wide. You will need 6 strips. Glue 3 together end from end. Sorry I forgot to take a picture of that step.

Next you will start working the slats around the wagon base using dimensionals to create dimension.

Do this for both a bottom and top set of slats.

Next you will be creating the wheels. I needed the wheels to be supportive since I was putting candy on the inside so I did them a bit different. You will need to punch out 6 1" circles and 2 you will cut in to halves.

On the half pieces you will place dimensionals double stacked, do this four all 4 half pieces.

Before placing the two pieces together this would be the time you added the brads if you wanted. Next place the half circle over the full circle so that they line up on the curves.

Glue the top half of the circle to the outside of the wagon with the half circle being underneath the bottom for support.
I hope that you found this tutorial helpful ... Happy Stamping!


10 comments:
Great tutorial. Maybe my after school class would like to make one of those. TFS
This is so cute!! I am hoping to o some stamping this weekend cause it is my birthday and I figure I can be a bit selfish... :) I am going to try one of these!
This is a fabulous tutorial! Thanks for sharing..you are so creative!
Wow! Great tutorial! I'm not sure how I missed your original wagon post--what a fun project! TFS!
Thanks for sharing (:
Amazing! Thanks for sharing!
This is a super tutorial - I'm filing it for future use. Thanks!
Oh wow!!! What a great idea. Thank you so much for the tutorial!!
Love the wagon, Carmen! Very cute. great job on the tutorial!
Thanks for a great tutorial. Both wagon's are gorgeous!
Post a Comment