In the next few days I will be adding a few links to my side bar for two different blogging groups I am in. They are a great groups and have a lot of different ideas and lots of talent. So if you feel inclined check them out.
Thursday, October 30, 2008
Happy Halloween!!
In the next few days I will be adding a few links to my side bar for two different blogging groups I am in. They are a great groups and have a lot of different ideas and lots of talent. So if you feel inclined check them out.
Wagon Tutorial
On all four corners of the 4 1/4" side up to where the score lines meet. Hopefully you can see the cut lines in the picture to the right.
Crease all of your fold lines and you will start to see how the base will form.
I found the multi adhesive is the best to put the base together. Place glue on the FRONT side of each of the four corners. This is important if you are going to use a DSP.
Fold in each tab to the inside of the base. This will make the inside of the wagon. To make the slats I used the weathered BG with Really Rust ink on a card front. Then cut strips 3/8"wide. You will need 6 strips. Glue 3 together end from end. Sorry I forgot to take a picture of that step.
Next you will start working the slats around the wagon base using dimensionals to create dimension.
Do this for both a bottom and top set of slats.
Next you will be creating the wheels. I needed the wheels to be supportive since I was putting candy on the inside so I did them a bit different. You will need to punch out 6 1" circles and 2 you will cut in to halves.
On the half pieces you will place dimensionals double stacked, do this four all 4 half pieces.
Before placing the two pieces together this would be the time you added the brads if you wanted. Next place the half circle over the full circle so that they line up on the curves.
Glue the top half of the circle to the outside of the wagon with the half circle being underneath the bottom for support.
I hope that you found this tutorial helpful ... Happy Stamping!
Wednesday, October 29, 2008
Bitty Boo Book
Tuesday, October 28, 2008
Forgot it was tuesday ....
My oldest recently turned 13 and the things he says makes me shake my head. Like this evening we were sitting watching TV together and he looks over and says "I'm lazy." Then he says "I agree with myself." Now if I said he was being lazy he wouldn't agree but he'll agree with himself. ::shaking my head:: what am I going to do with my teenage son??
Monday, October 27, 2008
Frapp Jars Halloween Style
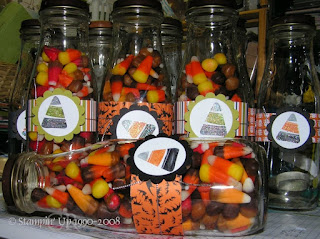
I made about 20 of them. I don't drink Frapp's so I've been collecting them from friends who do and I still have some
left over for other projects. I did the whole Candy Corn theme. I put all flavors of Candy Corn in the jars, Candy Apple, Caramel, Chocolate, Indian and Regular. The candy apple is almost as good as the regular flavor ... chocolate not so much. They were pretty easy to make especially with using the DSP. You can't really tell in the picture but I put iridescent ice over the Candy Corn image to make it sparkle. Happy Stamping!
Recipe: Stamp Set - Tasty Sweet, Cardstock - Whisper White, Basic Black, Kiwi Kiss, Accessories - Ghostly Greetings DSP, Iridescent Ice, Silver Cord, Scallop Punch, Old Olive Marker, Only Orange Marker, Black Marker, and Going Gray Marker.
Saturday, October 25, 2008
Top Note Treat
Here is another card I made that's SU mostly all except for the focal image. I did this one using brass template again and clear embossing paste that I added glitter to. It sure makes it sparkle! Happy Stamping!
Friday, October 24, 2008
Another 3x3 Attempt
Much better don't you think? I liked how this came out much better and decide I needed to make a treat holder to
I also wanted to share this cute Frankie card I got from my big sis. I'm a pretty big Frankie fan but haven't made on myself yet. She did a great job on it and now I think I just might have to try my hand at him. Happy Stamping!
Wednesday, October 22, 2008
Howling Good Time
Tuesday, October 21, 2008
Halloween Treat Holder
I think this mummy from Hey Ghoul Friend is one of the cutest. Doesn't he look like he is having a blast! I also
I know that usually I do a tutorial today but the two that I have ready are more for Christmas so I'm going to wait to share those until next month. I still have several Halloween Projects I want to share first so sorry no tutorial this week. Happy Stamping!
There are only a few spots left if you are interested in my stamp camp so don't forget to get your spot today!!
Monday, October 20, 2008
Altered Plastic Cups
I just love how adorable these things are .. they are even better in person. Basically I took the small clear dixie type cups and wrapped my DSP around it. Since cups are larger at the top then the bottom and because I didn't have a lot of time I didn't cut the paper to be the shape of the cup. Instead I just wrapped a strip of paper around and made pleats out of the extra paper. I attached the handle with another strip of paper using brads. Hope you like it!!
Saturday, October 18, 2008
From card to scrapbook page
I liked this card so much I thought it would look great as a scrapbook page.
I changed up the placement of the elements but everything is still the same design. So what do you think?
Recipe: Stamp Set - Booglie Eyes; Cardsstock - Pumpkin Pie, Old Olive, Lovely Lilac, Basic Black, Whisper White; Ink - Versamark, Pumpkin Pie; Accessories - Black Emboss, Watercolor Pencils, Blender pens, Google Eyes, Dimensionals, Black, Orange, Olive Ribbon
FYI for those who asked I will do a tutorial the last week of October for my pumpkin wagon so keep an eye out.
Friday, October 17, 2008
A Toast
I think it's very creative!! Thanks Pam!! When ever I get a card from Pam I am always careful not to tear into because she is notorious for having confetti in it!! You can see a bit of it on the envelope! Happy Stamping!
Thursday, October 16, 2008
Card Inspiration and class details.
Wednesday, October 15, 2008
Fall Pumpkins
Recipe: Stamp Set - Weathered ;Accessories- Small and large Oval Punch, Dimensionals, hemp; Cardstock - Creamy caramel, Pumpkin Pie, Garden Green, Close to Cocoa; Ink - Pumpkin Pie, Garden Green, Basic Brown
Tuesday, October 14, 2008
Technique Tuesday - Decor Elements
First thing you do is what I call warming up the Decor Elements image. You do this by just rubbing on the back side of the image, this will be the side that looks like contact paper with the grid on it. Rub for about a minute or so, longer if you and a large image.
Peel off the backing, I found if you keep it at a tight angle it peels well. If you find a piece is sticking to the background paper lay it back down and rub on the back again then continue to lift.
Place your DE on the surface where you want it. Once you have it in place just rub over the image.
Pull the second backing away from the image. Remember to pull at a tighter angle. Once you have that all peeled back you are all done.
Using Decor Elements is pretty quick and simple, just my style. This process took maybe all of 5 minutes.
A couple of other tips: the image and second backing are sticky so if you place it wrong you can readjust as long as you do the movements quickly, when readjusting don't hesitate and peel off in a quick and fluid motion or part of the image will stick and then you have a mess. Remember not to touch the actual image it won't stick properly if you do. Do make sure the area you are applying the image to is clean and dry. You can apply to just about any surface, just keep in mind if the area is not smooth it will be more difficult and take a bit more work. People have used them on walls, vehicles, picture frames, vinyl, windows, doors, motorcycles, fabric, wood, containers, refrigerator, mirrors, the possibilities are endless. Lastly have fun!
If you want to see the finished project it is in the post from yesterday. There are many different images now and a second line with lots of added colors. You can check them out on the picture link located on the right hand side of my blog. Happy Stamping!
